Tuesday, 22 January 2013

PowerShell - Create/Update SharePoint 2010 data from excel file

PowerShell - Create/Update SharePoint 2010 data from excel file
#*=============================================================================
#* Purpose: To Create/Update list items with data extracted from excel file.
#*
#* Note: The Upload is done through OLEDB object, so there is no necessary for MS Office to be installed in the server.
#*=============================================================================

Add-PSSnapin Microsoft.SharePoint.PowerShell -ErrorAction SilentlyContinue

$strFileName = Read-Host "Enter Excel Filename ::"
$strSheetName = Read-Host "Enter sheet name ::"
if ($strFileName -eq "") {
    throw "Please provide path to the Excel file"
    Exit
}
if (-not (Test-Path $strFileName)) {
    throw "File/Path does not exists - '$strFileName'"
    exit
}
if ($strSheetName -eq "") {
    throw "Sheet name cannot be null."
    Exit
}


##This fucntion is used to create new item..
Function fnCreateNewItem
{
param ([string] $webURL,[string] $listName,[string] $Title,[string] $Name,[string] $Address)
           
      #Get the SPWeb object and save it to a variable
      $web = Get-SPWeb $webURL

      #Get the SPList object to retrieve the "List"
      $list = $web.Lists[$listName]
     
      #Create a new item
      $newItem = $list.Items.Add()

      #Add properties to this list item
      $newItem["Title"] = $Title
      $newItem["Name"] =$Name
      $newItem["Address"] =$Address

      #Update the object so it gets saved to the list
      $newItem.Update()
}

##This fucntion is used to update existing item..
Function fnUpdateItem
{
param ([string] $webURL,[string] $listName,[string] $Title,[string] $Name,[string] $Address)
           
      #Get the SPWeb object and save it to a variable
      $web = Get-SPWeb $webURL

      #Get the SPList object to retrieve the "List"
      $list = $web.Lists[$listName]
     
      $spQuery = New-Object Microsoft.SharePoint.SPQuery
     
      #Query to filter data based on condition..
      $camlQuery = "<Where>
                              <Eq>
                                    <FieldRef Name='Title' />
                                    <Value Type='Text'>$Title</Value>
                              </Eq>
                        </Where>"
                       
      $spQuery.Query = $camlQuery  
      $spQuery.RowLimit =100 #Query Paging row limit..
      #Apply query and get all corresponding Item's...
      $spListItemCollection = $list.GetItems($spQuery)
      #Loop through every filtered items for data update...
      $spListItemCollection | ForEach-Object{
            $_["Name"] = $Name;
            $_["Address"] = $Address;
            $_.Update()
      }
}


$strSheetName = $strSheetName +'$'
$strProvider = "Provider=Microsoft.ACE.OLEDB.12.0"
$strDataSource = "Data Source = $strFileName"
$strExtend = "Extended Properties=Excel 8.0"
$strQuery = "Select * from [$strSheetName]"

$objConn = New-Object System.Data.OleDb.OleDbConnection("$strProvider;$strDataSource;$strExtend")
$sqlCommand = New-Object System.Data.OleDb.OleDbCommand($strQuery)
$sqlCommand.Connection = $objConn
$objConn.open()
$DataReader = $sqlCommand.ExecuteReader()
Write-Host "Processing...."
While($DataReader.read())
{    
      # Variables that we are going to use for list editing
      $webURL = http://<Site Url>      
      $listName = "<List Name>"
     
      #fnCreateNewItem $webURL $listName $DataReader[0].Tostring() $DataReader[1].Tostring() $DataReader[2].Tostring()
      fnUpdateItem $webURL $listName $DataReader[0].Tostring() $DataReader[1].Tostring() $DataReader[2].Tostring()
} 
Write-Host "Process Completed....!!!"
$dataReader.close()
$objConn.close()

Script Execution Steps:-
1) Pass PowerShell Script file name with entire path.
2) Pass Excel file name with entire path
3) Pass Excel Sheet name where the data exists.

Note: Web Url and List name has been hardcoded in above script, modify that to full fill your needs.

Configuring the Content Type Hub – User Manual

Configuring the Content Type Hub – User Manual
SharePoint 2010 now introduces a new feature called Content Type Hubs. Content Type Hub is a central location where you can manage and publish your content types – so now web applications can subscribe to this hub and pull down the published content types from the hub. Even receive updates on the published content types!

Procedure:-
1.       Create the web application and the root site which you want it to be the Content Type Hub. For eg:- http://<SiteURL>:<PortNo>/
2.       Now open the Central Administration, Click the Application Management. Under Service Applications, Click the Manage Service Applications

3.       Select the Managed Metadata Service and then Click properties as shown below

4.       You will get one Text box under the Content Type hub, Enter the URL of the Web App which you created in the first step [This Site Collection will acts as Content Type hub]
Also check the box below as shown in figure and Click OK.


5.       Now select the Managed Metadata Service Connection, and then click Properties as shown below

6.       Check the box of Consumes Content Types from Content Type gallery at [Your Web App which we configured in previous step]

This is for we explicitly tell to consume content types from the hub.

7.       Now, go to our content type hub site [which created in first step], Go to Site Actions and then Site Settings. Under Galleries click on Site Content Types, you will find default Content Type Available.
8.       Click on any Content Type where you can see Manage content type publishing option or else create a new Content Type by clicking Create option [ Recommended to create a new one to get clear idea]

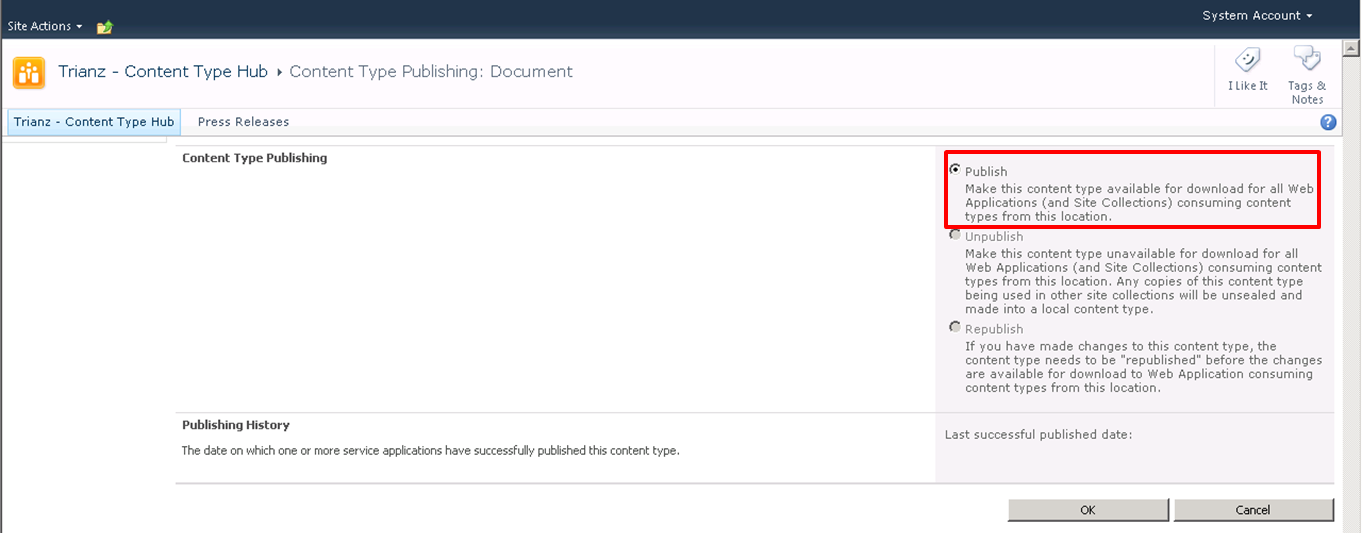
9.       Click the Manage content type publishing and Check the Publish Radio button and say OK.


This will publish the content types

Timer Jobs:-
In order to receive the published content types immediately, you can go and run two timer jobs immediately:
1.       Now open the Central Administration, Click the Monitoring. Under Timer Jobs, Click the Review Job Definitions.

2.       Run the timer jobs listed below immediately to reflect the changes/implementation to all site collection.
a.       Content Type Hub
b.      Content Type Subscriber (of the web application which is going to receive the content types updates)


Published Content Types:-
After running the timer jobs, the content types should be published.

1.      Now open the Central Administration, Go to Site Settings | Site Collection Administration | Content Type Publishing.


  1. Check the Refresh all Published Content types on next update and Say OK


Note: As long as the Web Application use the same Metadata Service Application the content type hub is using, it can receive the content types from the hub.

To Verify:-
1.       Create a Site collection of same or different Web Application
2.       Go to the Site Actions -> Site Settings. Under the Galleries click the Site Content Types you will be finding the Site Content type which we created in above Site Collection.

The First Site Collection [Content Type Hub]:-


The different Site Collection under different Web App, able to see the same Content Type:-


------------------------------------------------------XXXXXX------------------------------------------------------

Microsoft Virtual Lab – User Manual

Microsoft Virtual Lab – User Manual

1.       Open web browser and navigate to URL given below.
2.       Click on “Launch Virtual Lab” button to start Virtual lab session.


Note: Active X controls should be enabled for the browser.

3.       Once after lab preparation a request will be prompted to use Clipboard on local computer, Check to enable the same and click on “Connect” button.

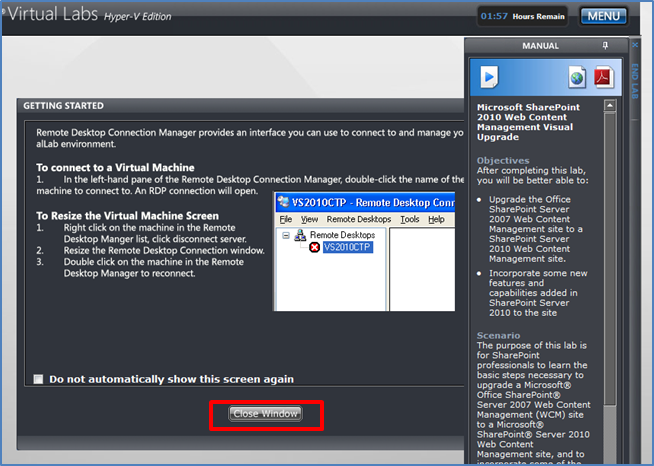
4.       Click on “Close Window” button, and then RDP for virtual computer will be listed.
          

5.       “Double Click” on computer name (“DC”) listed under “Remote Desktops” in left hand side of the screen. Once after this user will be successfully logged in to virtual machine.

A timer will be running on Top right corner of the screen, which shows the time available to close remote session.
        
Increase Remote Session Timing:-
1.       Click Menu -> Support->Troubleshooting/FAQ

2.       Click “And you would like to extend the duration……..” option, then click on “Click Here” which appears after above event. This action will increase your time by an hour. So user will be getting 3 hours continuously to practice SharePoint on virtual machine.


Use the credentials given below to play around SharePoint.
User Name: Administrator
Password: pass@word1
Note: You will loose all data once the session is closed, so please copy paste the project to your local machine in frequent intervals.  User credentials will remain unchanged for any instance of RDP session.


Tuesday, 4 December 2012

Troubleshooting SharePoint Quick Tip with the Logs

Troubleshooting SharePoint Quick Tip with the Logs

I just discovered a little trick for easing the process of reading and reviewing the SharePoint logs, so I thought I’d share.
Open a SharePoint log and you get an incredibly large file with so much info, especially if your logging is set to verbose. As I develop and I receive generic errors, I need to go into these aggravatingly large logs to find my real issue. Most cases it is easy enough to open it in Notepad++, search for the error and go from there.
I figured out this trick when troubleshooting a web part. I get a typical SharePoint generic error when trying to add it to a page. I find the error in the logs, and it’s just as generic there as well. Now I want to see the entire log history for adding the solution, activating the feature, and adding the web part to a page. I hope to find an error on solution install or feature activation.
So all I want to see is a small window of the log, not the entire thing. I could track my start time by staring at the server clock when I press Deploy and Activate, but even 10 seconds off can add dozens of lines in the logs.
What to do… let’s create a fresh new log for my activity.
Right before I’m about to perform my steps I want to monitor, I restart the SharePoint 2010 Tracing service. (go to Start > Administrative Tools > Services)

By restarting the service, this will create a new log file with the current date and time stamp. Now I walk through my process, recreate the error, and restart the service again. A new log file is created, and the previous one has that small window of time in it! Now I take this and I can comfortably read it, knowing I’m not reading more than I need. Sure enough, I found an assembly reference error on solution deployment.

Creating a new Service Application Proxy Group in SharePoint 2010

Creating a new Service Application Proxy Group in SharePoint 2010

As you create and manage service applications in your farm, you may decide to create additional services for different web applications. In my case, it was rather simple. I wanted a web application that didn’t use FAST, just the basic search functionality. This was on my development workstation and I wanted to keep some of the flexibility of being able to support customers on either version of search. Anyway, I created a new service application for basic search.
I went to manage my web application and clicked Service Connections, and saw that I could only select default or custom. For this single case, custom would be fine and I could just check off all of the services I wanted. I then thought larger scale, with a farm with several web applications on it, wanting to manage unique and separate services for the bunch.
There is no interface in Central Admin to create and manage additional service application groups. So a quick search online revealed Brian Cartmel’s article “Create a new Service Application Proxy Group with New-SPServiceApplicationProxyGroup”. I suggest reading it. I took his scriptlets and made me a script which created an entirely new group and assigned all of the services I wanted. See below.
New-SPServiceApplicationProxyGroup "SERVICEGROUP"

$serviceAppProxy = Get-SPServiceApplicationProxy | where { $_.Name -eq "Access Service" }
Add-SPServiceApplicationProxyGroupMember "SERVICEGROUP" -Member $serviceAppProxy

$serviceAppProxy = Get-SPServiceApplicationProxy | where { $_.Name -eq "Business Data Connectivity Service" }
Add-SPServiceApplicationProxyGroupMember "SERVICEGROUP" -Member $serviceAppProxy

$serviceAppProxy = Get-SPServiceApplicationProxy | where { $_.Name -eq "Excel Services" }
Add-SPServiceApplicationProxyGroupMember "SERVICEGROUP" -Member $serviceAppProxy

$serviceAppProxy = Get-SPServiceApplicationProxy | where { $_.Name -eq "Managed Metadata" }
Add-SPServiceApplicationProxyGroupMember "SERVICEGROUP" -Member $serviceAppProxy

$serviceAppProxy = Get-SPServiceApplicationProxy | where { $_.Name -eq "PerformancePoint Service" }
Add-SPServiceApplicationProxyGroupMember "SERVICEGROUP" -Member $serviceAppProxy

$serviceAppProxy = Get-SPServiceApplicationProxy | where { $_.Name -eq "Basic Search Service Application" }
Add-SPServiceApplicationProxyGroupMember "SERVICEGROUP" -Member $serviceAppProxy

$serviceAppProxy = Get-SPServiceApplicationProxy | where { $_.Name -eq "Secure Store" }
Add-SPServiceApplicationProxyGroupMember "SERVICEGROUP" -Member $serviceAppProxy

$serviceAppProxy = Get-SPServiceApplicationProxy | where { $_.Name -eq "WSS_UsageApplication" }
Add-SPServiceApplicationProxyGroupMember "SERVICEGROUP" -Member $serviceAppProxy

$serviceAppProxy = Get-SPServiceApplicationProxy | where { $_.Name -eq "UserProfileService" }
Add-SPServiceApplicationProxyGroupMember "SERVICEGROUP" -Member $serviceAppProxy

$serviceAppProxy = Get-SPServiceApplicationProxy | where { $_.Name -eq "Connection to Visio Graphics Service" }
Add-SPServiceApplicationProxyGroupMember "SERVICEGROUP" -Member $serviceAppProxy

$serviceAppProxy = Get-SPServiceApplicationProxy | where { $_.Name -eq "Web Analytics Service Application 1" }
Add-SPServiceApplicationProxyGroupMember "SERVICEGROUP" -Member $serviceAppProxy

$serviceAppProxy = Get-SPServiceApplicationProxy | where { $_.Name -eq "Word Automation" }
Add-SPServiceApplicationProxyGroupMember "SERVICEGROUP" -Member $serviceAppProxy
To use this:
  • Open Notepad and copy the contents.
  • Find and replace SERVICEGROUP with your desired group name, in my case it was NotFAST.
  • Go to Central Admin > Manage Service Applications and walk through and specify the service applications you want to include.
  • Save the file as CreateServiceAppGroup.ps1.
  • Open SharePoint PowerShell (Start > All Programs > Microsoft SharePoint 2010 Products > SharePoint Management Shell)
  • Navigate to where you file lives and enter .\CreateServiceAppGroup.ps1
  • Go to Central Admin > Manage Web Applications.
  • Click your web application and click Service Connections.
  • You will now see your new group listed.

Country List for Field Defs in SharePoint

Country List for Field Defs in SharePoint

Below is a country list for use in a field definition for SharePoint. Enjoy!
    <CHOICES>
      <CHOICE>Afghanistan</CHOICE>
      <CHOICE>Algeria</CHOICE>
      <CHOICE>Andorra</CHOICE>
      <CHOICE>Angola</CHOICE>
      <CHOICE>Antigua and Barbuda</CHOICE>
      <CHOICE>Argentina</CHOICE>
      <CHOICE>Armenia</CHOICE>
      <CHOICE>Australia</CHOICE>
      <CHOICE>Austria</CHOICE>
      <CHOICE>Azerbaijan</CHOICE>
      <CHOICE>Bahamas, The</CHOICE>
      <CHOICE>Bahrain</CHOICE>
      <CHOICE>Bangladesh</CHOICE>
      <CHOICE>Barbados</CHOICE>
      <CHOICE>Belarus</CHOICE>
      <CHOICE>Belgium</CHOICE>
      <CHOICE>Belize</CHOICE>
      <CHOICE>Benin</CHOICE>
      <CHOICE>Bhutan</CHOICE>
      <CHOICE>Bolivia</CHOICE>
      <CHOICE>Bosnia and Herzegovina</CHOICE>
      <CHOICE>Botswana</CHOICE>
      <CHOICE>Brazil</CHOICE>
      <CHOICE>Brunei</CHOICE>
      <CHOICE>Bulgaria</CHOICE>
      <CHOICE>Burkina Faso</CHOICE>
      <CHOICE>Burma</CHOICE>
      <CHOICE>Burundi</CHOICE>
      <CHOICE>Cambodia</CHOICE>
      <CHOICE>Cameroon</CHOICE>
      <CHOICE>Canada </CHOICE>
      <CHOICE>Cape Verde </CHOICE>
      <CHOICE>Central African Republic</CHOICE>
      <CHOICE>Chad </CHOICE>
      <CHOICE>Chile </CHOICE>
      <CHOICE>China </CHOICE>
      <CHOICE>Colombia </CHOICE>
      <CHOICE>Comoros </CHOICE>
      <CHOICE>Congo (Brazzaville)</CHOICE>
      <CHOICE>Congo (Kinshasa) </CHOICE>
      <CHOICE>Costa Rica </CHOICE>
      <CHOICE>Cote d'Ivoire </CHOICE>
      <CHOICE>Croatia </CHOICE>
      <CHOICE>Cuba </CHOICE>
      <CHOICE>Cyprus </CHOICE>
      <CHOICE>Czech Republic</CHOICE>
      <CHOICE>Denmark </CHOICE>
      <CHOICE>Djibouti </CHOICE>
      <CHOICE>Dominica </CHOICE>
      <CHOICE>Dominican Republic</CHOICE>
      <CHOICE>East Timor</CHOICE>
      <CHOICE>Ecuador </CHOICE>
      <CHOICE>Egypt </CHOICE>
      <CHOICE>El Salvador </CHOICE>
      <CHOICE>Equatorial Guinea </CHOICE>
      <CHOICE>Eritrea </CHOICE>
      <CHOICE>Estonia </CHOICE>
      <CHOICE>Ethiopia</CHOICE>
      <CHOICE>Fiji </CHOICE>
      <CHOICE>Finland</CHOICE>
      <CHOICE>France</CHOICE>
      <CHOICE>Gabon</CHOICE>
      <CHOICE>Gambia, The</CHOICE>
      <CHOICE>Georgia</CHOICE>
      <CHOICE>Germany</CHOICE>
      <CHOICE>Ghana</CHOICE>
      <CHOICE>Greece</CHOICE>
      <CHOICE>Grenada</CHOICE>
      <CHOICE>Guatemala</CHOICE>
      <CHOICE>Guinea</CHOICE>
      <CHOICE>Guinea-Bissau</CHOICE>
      <CHOICE>Guyana</CHOICE>
      <CHOICE>Haiti</CHOICE>
      <CHOICE>Holy See</CHOICE>
      <CHOICE>Honduras</CHOICE>
      <CHOICE>Hong Kong</CHOICE>
      <CHOICE>Hungary</CHOICE>
      <CHOICE>Iceland</CHOICE>
      <CHOICE>India</CHOICE>
      <CHOICE>Indonesia</CHOICE>
      <CHOICE>Iran</CHOICE>
      <CHOICE>Iraq</CHOICE>
      <CHOICE>Ireland</CHOICE>
      <CHOICE>Israel</CHOICE>
      <CHOICE>Italy</CHOICE>
      <CHOICE>Jamaica</CHOICE>
      <CHOICE>Japan</CHOICE>
      <CHOICE>Jordan</CHOICE>
      <CHOICE>Kazakhstan</CHOICE>
      <CHOICE>Kenya </CHOICE>
      <CHOICE>Kiribati</CHOICE>
      <CHOICE>Korea, North</CHOICE>
      <CHOICE>Korea, South</CHOICE>
      <CHOICE>Kosovo</CHOICE>
      <CHOICE>Kuwait</CHOICE>
      <CHOICE>Kyrgyzstan</CHOICE>
      <CHOICE>Laos</CHOICE>
      <CHOICE>Latvia</CHOICE>
      <CHOICE>Lebanon</CHOICE>
      <CHOICE>Lesotho</CHOICE>
      <CHOICE>Liberia</CHOICE>
      <CHOICE>Libya</CHOICE>
      <CHOICE>Liechtenstein</CHOICE>
      <CHOICE>Lithuania</CHOICE>
      <CHOICE>Luxembourg</CHOICE>
      <CHOICE>Macau</CHOICE>
      <CHOICE>Macedonia</CHOICE>
      <CHOICE>Madagascar</CHOICE>
      <CHOICE>Malawi</CHOICE>
      <CHOICE>Malaysia</CHOICE>
      <CHOICE>Maldives</CHOICE>
      <CHOICE>Mali</CHOICE>
      <CHOICE>Malta</CHOICE>
      <CHOICE>Marshall Islands</CHOICE>
      <CHOICE>Mauritania</CHOICE>
      <CHOICE>Mauritius</CHOICE>
      <CHOICE>Mexico</CHOICE>
      <CHOICE>Micronesia</CHOICE>
      <CHOICE>Moldova</CHOICE>
      <CHOICE>Monaco</CHOICE>
      <CHOICE>Mongolia</CHOICE>
      <CHOICE>Montenegro</CHOICE>
      <CHOICE>Morocco</CHOICE>
      <CHOICE>Mozambique</CHOICE>
      <CHOICE>Namibia</CHOICE>
      <CHOICE>Nauru</CHOICE>
      <CHOICE>Nepal</CHOICE>
      <CHOICE>Netherlands</CHOICE>
      <CHOICE>Netherlands Antilles</CHOICE>
      <CHOICE>New Zealand</CHOICE>
      <CHOICE>Nicaragua</CHOICE>
      <CHOICE>Niger</CHOICE>
      <CHOICE>Nigeria</CHOICE>
      <CHOICE>North Korea</CHOICE>
      <CHOICE>Norway</CHOICE>
      <CHOICE>Oman</CHOICE>
      <CHOICE>Pakistan</CHOICE>
      <CHOICE>Palau</CHOICE>
      <CHOICE>Palestinian Territories</CHOICE>
      <CHOICE>Panama</CHOICE>
      <CHOICE>Papua New Guinea</CHOICE>
      <CHOICE>Paraguay</CHOICE>
      <CHOICE>Peru</CHOICE>
      <CHOICE>Philippines</CHOICE>
      <CHOICE>Poland</CHOICE>
      <CHOICE>Portugal</CHOICE>
      <CHOICE>Qatar</CHOICE>
      <CHOICE>Romania</CHOICE>
      <CHOICE>Russia</CHOICE>
      <CHOICE>Rwanda</CHOICE>
      <CHOICE>Saint Kitts and Nevis</CHOICE>
      <CHOICE>Saint Lucia</CHOICE>
      <CHOICE>Saint Vincent and the Grenadines</CHOICE>
      <CHOICE>Samoa</CHOICE>
      <CHOICE>San Marino</CHOICE>
      <CHOICE>Sao Tome and Principe</CHOICE>
      <CHOICE>Saudi Arabia</CHOICE>
      <CHOICE>Senegal</CHOICE>
      <CHOICE>Serbia</CHOICE>
      <CHOICE>Seychelles</CHOICE>
      <CHOICE>Sierra Leone</CHOICE>
      <CHOICE>Singapore</CHOICE>
      <CHOICE>Slovakia</CHOICE>
      <CHOICE>Slovenia</CHOICE>
      <CHOICE>Solomon Islands</CHOICE>
      <CHOICE>Somalia</CHOICE>
      <CHOICE>South Africa</CHOICE>
      <CHOICE>South Korea</CHOICE>
      <CHOICE>Spain</CHOICE>
      <CHOICE>Sri Lanka</CHOICE>
      <CHOICE>Sudan</CHOICE>
      <CHOICE>Suriname</CHOICE>
      <CHOICE>Swaziland</CHOICE>
      <CHOICE>Sweden</CHOICE>
      <CHOICE>Switzerland</CHOICE>
      <CHOICE>Syria</CHOICE>
      <CHOICE>Taiwan</CHOICE>
      <CHOICE>Tajikistan</CHOICE>
      <CHOICE>Tanzania</CHOICE>
      <CHOICE>Thailand</CHOICE>
      <CHOICE>Timor-Leste</CHOICE>
      <CHOICE>Togo</CHOICE>
      <CHOICE>Tonga</CHOICE>
      <CHOICE>Trinidad and Tobago</CHOICE>
      <CHOICE>Tunisia</CHOICE>
      <CHOICE>Turkey</CHOICE>
      <CHOICE>Turkmenistan</CHOICE>
      <CHOICE>Tuvalu</CHOICE>
      <CHOICE>Uganda</CHOICE>
      <CHOICE>Ukraine</CHOICE>
      <CHOICE>United Arab Emirates</CHOICE>
      <CHOICE>United Kingdom</CHOICE>
      <CHOICE>United States</CHOICE>
      <CHOICE>Uruguay</CHOICE>
      <CHOICE>Uzbekistan</CHOICE>
      <CHOICE>Vanuatu</CHOICE>
      <CHOICE>Venezuela</CHOICE>
      <CHOICE>Vietnam</CHOICE>
      <CHOICE>Yemen</CHOICE>
      <CHOICE>Zambia</CHOICE>
      <CHOICE>Zimbabwe</CHOICE>
    </CHOICES>